Category Archives: Spices and Herbs

Click- Bicolour

Standard

Bi colour is the theme for the click event at Jugalbandi for this month. Thanks Jai and Bee for the oppurtunity to be one of the judges for this month.

Finding a bicolour entry has been a challenge. After a long time, I have started to cook regularly but bicolour foods weren’t easy to come by or didn’t photograph well. I made palappams, a cherry clafouti, paneer curry but nothing photographed well.

I finally settled on this paneer. This is some home made paneer with black pepper added to it.

paneer for click

Whole milk paneer with crushed black pepper- White & Black entry for CLICK bicolour.

Handmade Basil Pesto for GBP Summer 07

Standard

handmade-basil-pesto.jpg

A recipe that mentions its source as grandmother or mother instantly attracts my attention. I have a sort of blind faith in such recipes. When Heidi of 101 cookbooks blogged this pesto recipe from her friend’s mother, it was instantly bookmarked.

Our basil herbs were fresh with new young sprouts after a recent harvest and it would be perfect with the grilled lamb chops that were making for dinner. And better yet, no food processor to clean.

basil.jpg

Original recipe here

Young basil leaves – 1 cup packed.

Garlic- 2 cloves

Pine nuts – 2 tbsp

Parmesan cheese freshly grated- 1/4 cup

Good quality extra virgin olive oil- 2 tbsp

For mincing, you will need a sharp mezzaluna, but I replaced it with a crinkle cutter.

There is only one step. Mince till you get a fine mince of the ingredients. Heidi recommends starting with the garlic and 1/3 rd basil. Keep adding the ingredients in parts till everything is minced. Start with garlic, then basil, followed by pine nuts and cheese.

pesto-making.jpg

Once mincing is done, transfer the pesto into a bowl and add the olive oil.

At this point I kept it in the refrigerator. At dinner time, mixed it with some cold angel hair for a cold pasta side dish. It was delicious. Thanks Heidi for sharing this wonderful recipe. It was really relaxing mincing and mixing with hand and using the crinkle cutter.

As Heidi said, there is no salt and pepper in the pesto. So salt your pasta water generously.

This is my entry for Summer Green Blog Project being hosted by Deepz of Letz Cook.

GBP was originally born in the ever scheming head of dear Inji. Ever since many bloggers have discovered their green thumbs and have grown wonderful things. Join the fun!

T is for Thyme

Standard

For this years herb garden, we have thyme, basil and parsley. We also have shallots, chives , rosemary and curry leaf from the previous years.

Thyme doesn’t need a lot of water. This is ideal for gardeners like us who don’t like to water too much.

The flowers of thyme are white and as tiny and delicate as the leaves. This flower is my entry for Flower Fest and the current alphabet is T.

Image of thyme flower at the Bookmann. 


Thyme leaves are very fragrant and goes well with veggies, rice, seafood and meat. I remember a Cajun dish with shrimp and thyme from a long time ago. That memory was the inspiration for this dish.

Shrimp with chili-thyme marinade

Recipe:

Garlic- 2 cloves

Thyme sprigs- 3 sprigs ( As the sprigs were tender, I used them whole. )

Crushed red pepper- 1 tsp

Olive oil- enough to make a paste approx. 1 tbsp

Salt to taste.

Shrimp- 1o or 12 cleaned.

Using a mortar and pestle, grind garlic, thyme sprigs, crushed red pepper. After coarsely grinding the above, add olive oil and make into a paste.

Add the paste to the cleaned shrimp and marinate for about half an hour.

Grill or saute the shrimp.

Shrimp served over wild rice

Note: I cooked the shrimp stove top on a cast iron pizza stone. Since the marinade already had oil, there was no need to add any oil to the stone.

The shrimp was very flavorful. I served it with some wild rice. The shrimp would be great as an appetiser.

Happy Birthday, Meeta.

Standard

rose.jpg

When summer comes, the roses in our garden steal the show. We have a climbing rose that blooms with a vengeance. Even better, once the summer blooms are gone, they bloom again around fall. What better flower to celebrate Meeta’s birthday. Her dishes are glamorous, her pictures captivating and sleek, and her writing is lots of fun. She has invited us over to celebrate, and I had to make something elegant! Got to keep up, right?

angel-hair-pasta-with-pesto.jpg

Original recipe: Here

I made this dish when I was really hungry, and so measurements are approximate.

Make the pasta according to package instructions. I only made enough for one serving.

While the pasta is cooking, you can assemble ingredients for the pasta. I took about 15 basil leaves, a tbsp of pine nuts, a garlic clove, generous splash of rose water and streamed in olive oil into the food processor to make a pesto. Then I added parmesan cheese (grated), salt and pepper to complete the pesto.

Once the pasta is cooked, mix it with the pesto and decorate the dish using rose petals. You can leave the petals as it is. I made confetti like pattern by just slicing the petals into thin strips.

I was very very skeptical about the dish, but I ate every bite of it and enjoyed it. The aroma of the rose water is not overpowering. I think the aroma of the basil leaves blends well with the rose water. A simple dish made elegant with the sprinkling of rose flower confetti!!

Meeta, I hope you enjoy the dish and wish you a very happy Birthday!!

C is for chive

Standard

chive-flower.jpg

Chive flower – my entry for Flower Fest, hosted by the very talented Sree

Chives are abundant in our garden during spring and summer. They have small purple heads and have a lot of oniony flavor. If using in salads, I seperate the flower into small pieces and scatter them. Little bursts of onion flavor. Some say chives and roses grow well together and I think this is true. The chives under the roses flourish much more than the ones that are standing alone.

This is a recipe I want to try next time with these flowers. And this one.

Tale of two pestos

Standard

parsley.jpg

Parsley leaves and flower
Althouth we make pasta quite often, we have never made pesto before. Pasta and pesto sound so close, no wonder they are made for each other. I had some parsley growing crazy in my garden and some of them had started to flower which meant that if I dont act quickly, they would all be gone and not edible anymore. So we had to act fast. Meanwhile Satish had been craving for pasta for some time. And finally it seemed to be the best possible time for some ‘pasta with pesto’.

I just read the rules of herb blogging and it requires you to write somehting about the herb. Makes sense, but I hardly know anything about parsley except that it is used in Italian and Meditteranean cooking, and also have two forms- the curly one and the flat leaf one. The ones I grew were flat leaf . They hardly require any special growing conditions. I never watered them regularly, they just grew on rain water. I definitely had to search for more info on this herb and this is what I found.

Parsley is the world’s most popular herb. It derives its name from the Greek word meaning “rock celery” (parsley is a relative to celery). It is a biennial plant that will return to the garden year after year once it is established.Parsley is among a small number of foods that contain any measurable amount of oxalates, naturally-occurring substances found in plants, animals, and human beings. When oxalates become too concentrated in body fluids, they can crystallize and cause health problems. For this reason, individuals with already existing and untreated kidney or gallbladder problems may want to avoid eating parsley.(Info from here.)

One of the blog posts in The Traveler’s Lunchbox some time ago had been on pestos, and it had somehow stuck to my brain. So I found the recipe, but unfortunately it did not have a recipe for parsely pesto but it did have one for a sundried tomato pesto (Pesto Rosso). It looked so fab that we had to try that out. Now as for the parsley, this recipe came to my aid.

pesto.jpg


Parsley Pesto Ingredients( I did not measure any ingredients, just combined them all and tasted it to balance all the ingredients.)Parsley, pine nuts, parmesan grated, salt, garlic and extravirgin olive oil.
Now we all know linguini is cooked as it is, I mean in its all entire form (not broken).But recently we had eaten at an Indo Chinese restaurant in NY City and I had loved the hakka noodles which looked like linguini broken into small pieces. So that is what I did with the linguini…broke it into 3 parts.

two-pestos.jpg


Linguini with two pestos– sundried tomato pesto and parsley pesto.

Made a batch of each pesto and mixed it with pasta. We were very satisfied with both pestos. The remaining pesto was used as a sandwich filler. We still had leftover pesto which we had with some bread and cheese.


bb.jpg

This is my entry for Weekend Herb Blogging held by our own Bachelor Boy.

Tagged , .

Lamb chops with mint yogurt sauce- recipe

Standard

Creating a beautiful plate of food is immensely satisfying for the eyes and mind. On a weekend day, we decided to take our dining at home to a fancier level and that is how this dish was born.

Lamb chops are always elegant and is one of the easiest meats to cook. The strong flavor of the lamb can stand up to strong flavorings. This recipe for lamb chops is from the cookbook: Gourmet Meals in Minutes. The beautiful picture of the lamb chops on its cover is what made me buy the book.

abs.jpg
Recipe

Mint yogurt ( recipe from Starchefs, Chef Thomas John at Mantra, Boston)

1 cup fresh mint leaves, well rinsed and tightly packed

1 cup cilantro leaves, as above

2 cloves garlic

1/4 cup onion, chopped

salt, to taste

1/4 cup raw mango, pitted and sliced

2 Tablespoons fresh lime juice

1/2 cup plain yogurt

Blend all ingredients in a blender. I used only half of the above measurements for two people.

Lamb chops( Broiled)

8 lamb chops

3 tablespoon reduced-sodium soy sauce

1 tablespoon each of Dijon mustard, Worcestershire sauce, veg.oil and chopped rosemary.
Freshly ground black pepper half tsp or more to taste

Thyme 2 tsp.chopped ( I used a tsp. of dried thyme) – optional

Salt and pepper to taste

Method

Combine soysauce, mustard, Wostershire sauce, veg. oil, pepper, rosemary, thyme into a ziplock bag. Add the lamb. After squeezing the air out, seal the bag and turn to coat the lamb with the marinade. Refrigerate for 30 min.

Preheat the broiler. Remove the chops from the marinade. Brush off excess marinade off the bones or else it burns under the broiler. Season the chops with salt and pepper.

Broil the chops 5 inches from the heat until done. 4 min on each side for medium , and about 6-7 min for well done. Remove and cool for a few min and then plate. If desired, you can pan fry the chops before putting under the broiler.

To plate

Create a base using the mint yogurt. Place 2 lamb chops in an intercrossing pattern or side by side as seen in the picture.

Use a tuna can with top and bottom removed. Fill the rice into this to plate rice in a circular shape. If you have another side dish, place it on the side of the lamb chops.

Ancient Spices -Black Pepper

Standard

a1.jpg

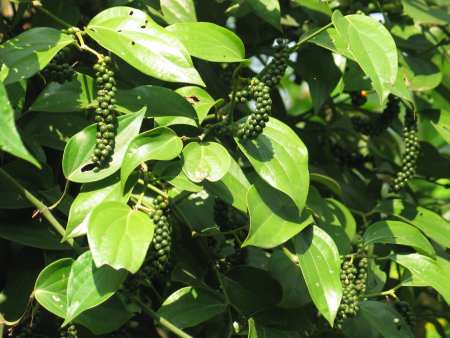
This picture was taken during my last visit to Kerala. Not the best picture but good enough to appreciate the lovely beaded pepper. What made me bring this picture out is the ‘ The Spice is Right’ food event, hosted by Barbara of Tigers and Strawberries. Black pepper needs no introduction. Well known, well loved, black pepper is a regular item in every pantry.

Black pepper is grown as a cash crop in Kerala, my homestate. This was a major source of income for most Kerala farmers. Nowadays, due to the high costs of farming,people have turned to other economical crops or totally given up farming. When my grandfather was alive, he used to be incharge of these peppers that would spread like a vine onto trees..almost everytree in the plot had a blackpepper vine hugging it. When they flower and bear fruit, they are the most beautiful things to look at..perfect round globes arranged in perfect symmetry around one long spike. When they ripen, they assume a shade of red. The person who plucks these peppers are a sight to watch. They carry long ladders made of bamboo and have a sack around their waist to collect the peppers. I was allowed to pluck the peppers from the lower parts of the plants and that is the way I used to collect my pocket money during my vacation.

Once they are collected, they are made to seperate from the small twig that bears them by crushing them under the feet. I used ‘crushing’ for lack of a better term. They are king of churned slowly under your feet and they seperate from the spike to which they are attached. I think we wilt them under the sun before this process so that the skin doesn’t get damaged. Then they are dried under the sun, where they get the black look and hence the term ‘black pepper’. It is amazing how much less these dried ones weigh compared to the freshpicked berries. If you pluck a whole sack of these, once dried and when ready to use they might yield, maybe a quarter of their original weight. I used to be so dismayed at this when I was a kid and felt so cheated. Once they are dried, they are tied in sacks and kept away for future use. Noone I knew ever bouught black pepper in stores, they were always stored in the dark store room and when relatives visited from other states, they always left with a big bag of these.

For more on black pepper , click here

ab.jpg
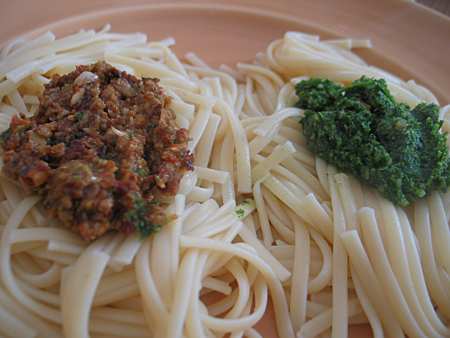
Now for a recipe that highlights pepper, the first thing that comes to my mind is a garlic and pepper rasam that I had at my brother-in-law’s home. I made a quick call to my sister but couldnt get through to her. I have made rasam only one time before and so I had to look up a recipe somewhere, and I found one in this book. The book had a black pepper rasam with tamarind which I followed closely. I added some garlic to this recipe and it was very close to the one I tasted at my brother-in-laws house.

Recipe

1 tsp coriander seeds

1/2 tsp black mustard seeds

1/2 tsp cumin seeds

1/2 tsp whole black pepper

3/4 tablespoons urad dal

2whole dried red chiles

1 tbsp veg oil

Add the oil to a hot pan and add the above ingredients to the oil. The mustard seeds will splutter and the cumin and urad dal starts turning brown. Be ready to be bowled over by the fragrance of the spices roasting in the oil. Keep a close eye on them and remove when they start turning brown, maybe a min or so.

Let it cool to room temp. and grind them using a mortar and pestle. ( The original recipe suggests grinding it to a powder) I just ground them coarsely.

a2.jpg

Step two: Making tamarind extract

b1.jpg
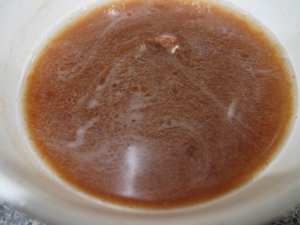
Take a small size piece of tamarind and place it in a bowl of warm water. Use your hands to extract the juice from the tamarind. It yields a browncolored liquid. This is the tamarind water that lends the sour taste to the rasam.

( Alternatively use a tsp of tamarind concentrate)

Final assembly

Oil 1/2 tablespoon

Mustard seeds 1/2 tablespoon

Garlic cloves 2 crushed

Curry leaves 3 or 4

Coriander leaves to garnish

Salt to taste

To a saucepan over medium heat, add oil and add mustard seeds to the hot oil. When the mustard seeds splutter, add the garlic cloves and curry leaves. When the garlic starts turning brown, add the tamarind extract and about 2 cups water. Add the spice mixture, salt and bring to boil. Let it simmer for few min (3 to 5) and serve with rice. In some restaurants, they serve this as a soup or first course. You can add more water if you like a more watery rasam.

c6.jpg

This turned out really well..much better than my rasam that I had made earlier. Looks like this is going to be a well loved dish at my house, considering that I had two helpings of rice just to enjoy the rasam.

Cardamom Creme Brulee – Indo French Fusion

Standard

c.jpg

Indo French fusion is something you dont hear about everyday. Chef Raji Jallapelli is one chef who specialises in this kind of fusion. And since the theme of Rasoi this month is Fusion, I decided to do this dessert by Raji. This recipe is from her cookbook Raji Cuisine : Indian Flavors, French Passion. Although the chef doesn’t necessarily agree with using the term ‘fusion’, I am using this recipe as it is a perfect match of an Indian spice with a French dessert. This creme brulee was made especially for My Rasoi event at Meena’s Hooked on Heat
The spiciness of the cardamom and the richness of the eggs and cream makes this a very luscious dessert. Creme brulee, to me, was a strictly restaurant dessert. I had no idea that my broiler could substitute for a hand held torch. Isn’t that cool?

Here is the recipe

Egg yolks 6

Sugar half cup

Heavy cream 2 cups

Freshly ground cardamom 1/2 teaspoon

Vanilla essence few drops

Light brown sugar – enough to cover the top of the creme brulee dishes

Preheat the oven to 325 degrees. Butter 4 brulee dishes or ramekins. Combine the eggs and sugar to form a smooth mixture. I use a hand held mixer to do this job.

Heat the heavy cream in a saucepan over medium heat. When small bubbles appear along the edges of the pan, remove from heat and gently stream it into the yolk mixture. Make sure you use a whisk to continously stir the mixture till all sugar dissolves. Finally add the cardamom powder and vanilla. Combine thoroughly.

c2.jpg

Place the creme brulee dishes in a baking dish. Add warm water ( I used a kettle) to reach halfway up the sides of the dishes .

Place a strainer in each dish and pour the mixture equally among the dishes. The above mixture is enough to fill 4 dishes.

c3.jpg
Bake for about 25min ot till they are set. If you leave it in for too long, it will turn grainy.Remove from the oven and cool. Keep in the fridge for atleast 3hrs or till ready to use.

When ready to serve:

Sprinkle the top of each custard evenly with brown sugar.

c6.jpg
Place the dishes under the preheated broiler for about 2min, keeping a close eye on the custard. It needs to be kept close to the broiler)(2 to 3 inches for the tops to turn brown. I hard to place them on an inverted baking dish on the top rack of the oven to reach the ‘desired’ height. Broil until the sugar melts and caramelises. Turn the pan to make sure all parts gets evenly browned.

c5.jpg
Remove without burning your fingers and serve immediately.
c7.jpg

This is such a fantastic show stopper after any meal. This is so easy that it can spice up any weekday dinner with no effort! It is advisable to put only 2 cremebrulee dishes at a time when broiling them. If this is your first time, I would suggest broiling them one at a time.
c8.jpg

Enjoying the fruits of our labor.

Vanilla

Standard

vanilla pods.jpg

I had been dying to see these vanilla beans when I went to Kerala for my short vacation. My parents after their retirement had turned to growing vanilla plants among others and everytime they would mention vanilla I couldnt wait to see these beauties. When I was in India, vanilla was not popular as a cash crop. But now it is very common in Kerala. I am not sure if it common in other states. Rubber plantations which are very common in Kerala are soon being replaced by vanilla plantations. The warm and humid climatic conditions have really adopted the plant to its soil.
My first introduction to vanilla was the vanilla essence which we used to add religiously to every cake we made as kids. I remember when I enthusiastically drank a teaspoon of vanilla extract thinking it would taste as great as it smelled. Boy, was I wrong. But that didn’t end my love affair with vanilla.
vanill alea.jpg

A closer view of the leaves

I was quite surprised when I stepped outside to see the sorroundings after I got home. It was green all around and there were small patches of ginger,numerous okra plants, long beans called ‘achinga’ in Malayalam and so many things to see and enjoy. It was just wonderful to just walk among all the veggies and to see mom pick them up fresh and cook them for me. They had changed the whole place to a green paradise. They have gone at it with all their heart and they even have a pit where they make their own compost using earthworms. I didn’t go near the pit although now I wish I had observed more.
The vanilla plants are climbers on a supporting tree. The leaves are so beautiful to look at with the bright green and waxy texture. The beans look like french beans but more slender and rounder. The method to process the vanilla bean is long. First of all, the flowers have to pollinated by hand .The beans once they areripe are plucked, added to boiling water. The fragrance of the vanilla beans is just so great and it permeates the whole kitchen. Then they are taken out allowed to dry in the sun for few hours every day. And finally when the green beans turn blackishbrown they are ready and I believe it takes almost 15 to 20 days.
van.jpg

The orchid on its supporting framework

I also heard stories about vanilla plants and beans being stolen from peoples land during the times when vanilla was fetching big prices.
vanilla.jpg

These are the vanilla beans stored carefully. I used a few of them already in some of my recipes. I feel really rich having these in my store:). I used them in the pistachio cake .

This is my submission for weekend herb blogging at Kalyns Kichen